How to run the ColabFold notebook on a HPC over SSH
Table of Contents
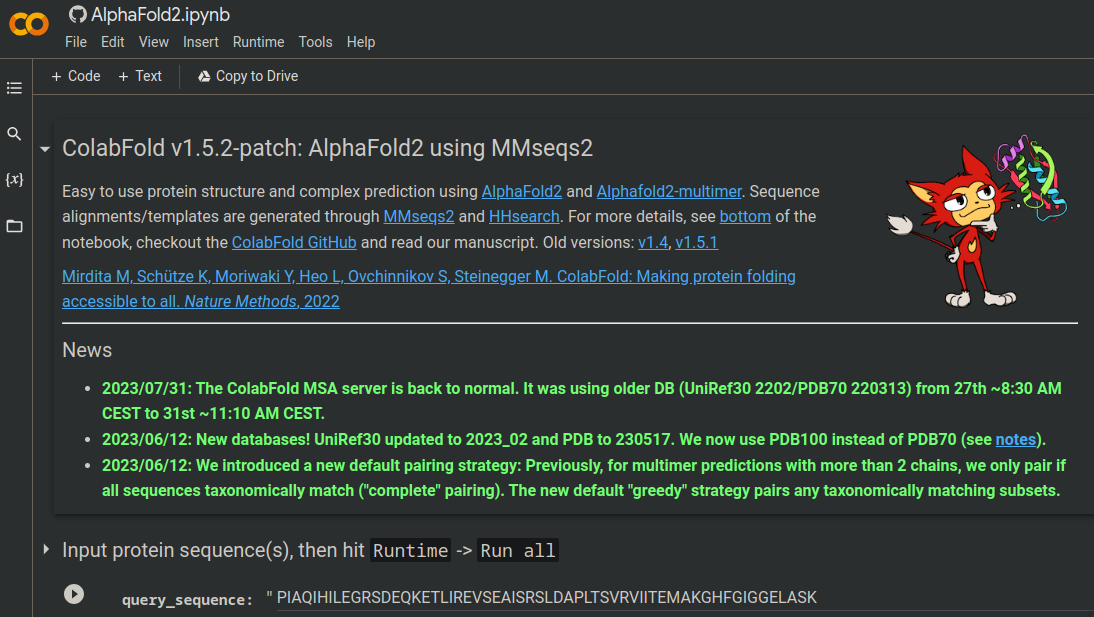 The ColabFold notebook
Introduction
ColabFold is amazing. If you haven’t heard of it yet, it’s basically a user friendly implementation of AlphaFold2 with a significantly faster multiple sequence alignment (MSA) step. You can run it straight from a Google Colab notebook for free, and it gives you numerous options to change the AlphaFold parameters without messing around with scripting. Furthermore, ColabFold outputs beautiful publication ready plots in .png form of the MSA, pLDDT, and PAE data, as well as giving you a well organised .zip folder with all the results and .pdb models. The ColabFold authors (namely Sergey Ovchinnikov) have also made other Colab notebooks that allow users to accomplish tasks such as running RoseTTAFold2, OmegaFold, and AlphaFold2 in batch.
The problem of relying on Google for GPUs
The issue, however, is that GPUs are expensive, and you can quickly chew through the free GPU quota Google sets for users after a few ColabFold jobs. One way around this is to keep registering free Google accounts to get more free quotas. However, this is tedious, and still comes with the risk of relying on free GPU instances, which Google reserves the right to terminate at any point, even mid-job. Another option is to pony up and spend some cash on GPU time with a Colab Pro account. I’ve tried this out of curiosity and spent $15 AUD for a “pay as you go” plan with a quota of 100 compute units. I spent all these 100 units during a single job, and it still wasn’t enough units to get the job finished before it terminated on me. So that was $15 down the drain… A third solution is to setup a local runtime on your own computer and run the ColabFold job through your personal GPU resources. This option is getting better because it’s free (ignoring your power bill) and you’re not relying on Google’s fickle GPU allocation system. However, this still isn’t ideal for myself and most people, who only have a standard laptop GPU available (I have a NVIDIA GeForce GTX 1650 Ti running on my Dell XPS 17 9700). These sorts of GPUs aren’t powerful enough to run AlphaFold/ColabFold in a reasonable amount of time and will likely most of your day depending on the size of the protein sequence submitted. It’s best to stick with higher end GPUs common in machine learning work, like NVIDIA’s A40, T4, and better still, the A100, which will run AlphaFold/ColabFold in a couple of hours to minutes (depending on the GPU, sequence length, sequence complexity, and other parameters of course).
A solution (for some)
The solution I’ve found that works best for myself is running ColabFold on my university high performance computing (HPC) cluster that I have access to (Monash Uni’s Massive M3 cluster). Of course, not everyone has access to a HPC, but I assume that if you’re running AlphaFold a lot, there’s a good chance you’re a researcher at a university to begin with, so that makes you the target audience of this blog post! Most universities have a HPC that will grant staff and students access to after filling out some forms, and that gives you an extremely powerful computing resource at your fingertips which is well worth taking advantage of for your computational needs.
Working with a HPC can be tricky though. And trying to connect a Colab notebook like ColabFold to a HPC is not straightforward for a novice. So, in an attempt to provide some clarity to this issue, here’s my guide on how to connect the ColabFold notebook to a local runtime on your university HPC over SSH. Keep in mind, this guide is broadly applicable to running any Colab notebook on your HPC too.
Prerequisites
Some things we need to have setup on our local machine beforehand are:
- A Linux command line environment, like having a linux operating system, a MacOS, or the Windows Subsystem for Linux (WSL) if you’re a Windows user
- access to a HPC, with permission to use some of the GPU partitions (preferably an A40, T4, or A100 GPU)
- a
condaenvironment with on our remote HPC server - a SSH keypair to login to your HPC without the need for passwords
If you don’t have the second point setup yet, you should contact your HPC’s system administrators and request all the access you need.
Having the SSH keypair setup is essential for this entire method of running ColabFold to work at all, so we’ll go through how to do this first.
SSH setup
Run the following on the terminal of your local machine (i.e. not logged into your HPC).
ssh-keygen -b 4096 -t rsa -C "Add your own personal comment between quotes"
The command will prompt you to give this new keypair a name. I name mine something simple
like hpc_key. It will also prompt you for a passphrase next. You can leave it blank,
although it’s strongly recommended that you enter a strong passphrase that you can
remember for an extra layer of security.
This will generate the keypair in your ~/.ssh folder, which consists of a public key and a private key.
The private key stays exactly where it is, while the public key (denoted by the .pub file extension) is what we need to send to the remote ~/.ssh folder on your HPC.
You can simply copy and paste the contents of the public key to remote ~/.ssh/authorized_keys on your HPC.
Alternatively, I prefer using other SSH command line tools to achieve the same outcome,
which saves me from the potential for human error involved in manual copy and pasting.
To do this, first add your new SSH key to the SSH client like so:
ssh-add ~/.ssh/<KEY_NAME>
No need to specify whether it’s the public or private key, it’ll figure that out automatically. It’s good to double check this command worked as expected with,
ssh-add -l
This should list the various keys you have setup on your SSH client, including your new keypair you just made for the HPC.
Next, add the public key to your remote HPC server with,
ssh-copy-id -i <KEY_NAME> username@remoteserver
No need to specify the path to the key here. This command will copy the public key to the
~/.ssh/authorized_keys file on your HPC. If the file authorized_keys didn’t already
exist, it creates one automatically.
Now you should be able to login to your HPC without being prompted for a password by simply typing
ssh username@remoteserver
And that’s it!
Note!: if your
authorized_keysfile is already populated with other public keys, there is a small chance that thessh-copy-idcommand can accidentally paste your new public key in on the same line as another key without adding a newline break. If this happens, it would render those keys ineffective. It’s an easy fix though, just make sure every key appears on its own separate line by checkingauthorized_keysin your favourite terminal editor likevimornano
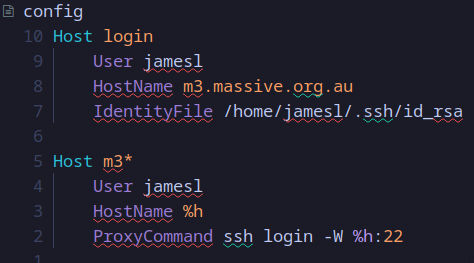
A note about ssh config
I highly recommend having a ssh config file, as they’re a powerful tool for SSH’ing into remote servers more efficiently,
as well as managing multiple SSH keys for accessing multiple remote servers.
It will also make the ssh port forwarding into a GPU node easier later on.
You can find the SSH config file under ~/.ssh/config. If you don’t have one you can easily create one with touch ~/.ssh/config.
Here’s a basic ssh config template:
Host <name-for-your-HPC>
    User <your-username-on-the-HPC>
    HostName <HPC-server-address>
    IdentityFile /home/username/.ssh/<ssh-key-name>

Host <name-for-GPU-node-on-HPC>
    User <username>
    HostName %h
    ProxyCommand ssh <name-for-your-HPC> -W %h:22
For example, here’s how I’ve setup my SSH config which allows me to SSH into any compute node on my HPC (each node on my university HPC starts with “m3” followed by a specific number):
1. Install ColabFold dependencies
Option 1: install with poetry
The ColabFold repository on GitHub uses python-poetry to manage its python dependencies,
so we’ll need to install these dependencies into a virtual environment on our remote HPC server.
If the sysadmins in control of your HPC have a version of Python3.8+ installed already,
then that makes installing the dependencies with poetry a breeze.
First, create a new python virtual environment in your remote HPC home directory (or directory of choice) with
python3 -m venv .venv
Then install poetry with
~/.venv/bin/pip install -U pip setuptools
~/.venv/bin/pip install poetry
Next, navigate to an appropriate project directory to clone the ColabFold GitHub repository in (do NOT install into the login node, otherwise the sysadmins will probably get mad)
git clone https://github.com/sokrypton/ColabFold
Now install the dependencies with poetry
cd ColabFold
~/.venv/bin/poetry install
poetry will recognise the poetry.lock file within the ColabFold repo and install the dependencies listed there.
A virtual environment containing these dependencies can now be activated by running poetry shell.
Option 2: install with conda
In my own case, the university HPC I use only has Python3.6.
This isn’t that big of an issue, because I can use conda to install any python version between >3.8 and <3.11 which poetry and ColabFold requires.
In theory, I should be able to create a conda environment with Python3.8, install poetry, then install the ColabFold dependencies by running poetry install as described above.
While I was able to use poetry from a conda environment, I ran into issues with the Colab notebook not recognising the poetry shell environment, and I’m not sure why.
I gave up on trying to make conda and poetry environments work together and instead decided to install all the dependencies into a conda environment.
The following setup worked for me, though it required some trial and error:
First, generate a conda friendly requirements.txt file from ColabFold’s poetry.lock file with
git clone https://github.com/sokrypton/ColabFold
cd ColabFold
poetry export --without-hashes --without-urls \
| awk '{print $1}' FS=; \
> requirements.txt
Install these dependencies into your remote HPC’s conda environment
conda activate
conda create -n <ENV_NAME>
conda activate <ENV_NAME>
conda install --file requirements.txt
I had issues installing specific versions of few dependencies, namely tensorflow, libclang, setuptools, and dm-haiku. So I decided to install just the latest versions of each, and thankfully this didn’t cause any incompatibilities.
conda install tensorflow libclang setuptools dm-haiku
I also needed to install jupyter (of course) and google-colab
conda install jupyter google-colab
Basically, if I noticed the ColabFold notebook running on my local instance threw an error for missing a dependency, I went ahead and installed that into the conda environment and tried again. Not an elegant solution, but I got there.
2. sbatch script setup
Setting up the conda environment is the probably the hardest step.
Next we need to setup a sbatch script that will make us a jupyter notebook environment that we can connect to via SSH.
Create the script with touch run-colab-notebook.sh and populate its contents with relevant info like so
#!/bin/bash
#SBATCH --job-name="colab-notebook"
#SBATCH --account=<YOUR_PROJECT_ACCOUNT_NAME>
#SBATCH --time=2:00:00      # alter time as seen fit
#SBATCH --partition=gpu
#SBATCH --gres=gpu:A40:1    # choose an appropriate gpu partition
#SBATCH --ntasks=1
#SBATCH --ntasks-per-node=1
#SBATCH --cpus-per-task=16
#SBATCH --mem=200G          # alter RAM as seen fit
#SBATCH --chdir="/home/username/path/to/project-dir"
#SBATCH --error=notebook_log_%j.err

# if using poetry env
module purge
cd /home/user/path/to/ColabFold
source /home/user/path/to/.venv/bin/activate
poetry shell

# if using conda env
module purge
source /home/user/path/to/your/miniconda/bin/activate
conda activate {YOUR_COLAB_ENV}

export XDG_RUNTIME_DIR=""
login_node="m3.massive.org.au" # your HPC server here
port={PORT_NUMBER_HERE*}

jupyter notebook \
  --NotebookApp.allow_origin='https://colab.research.google.com' \
  --port=${port} \
  --NotebookApp.port_retries=0
wait
Some important notes worth mentioning with this example sbatch script:
- Be sure to edit this template to only include either the poetry or conda virtual environment, as well as edit details specific to your use case.
- The ColabFold result files will be output in the directory specified by
#SBATCH --chdir=, so it’s important to set that to somewhere useful. Same goes for the.errfile, which we’ll need for the Jupyter notebook token in step 6. - The “port” must be included (how to find an open port is described in the next step)
- It’s necessary to specify a number of CPUs under
--cpus-per-task=for the ColabFold code to run at all. This is because ColabFold runs the initial MMseqs2 step for generating an MSA with CPUs, not GPUs. Additionally, the optional Amber relax step can only be run on CPUs. - For simplicities sake, I usually request as much GPU RAM as possible under
--mem=, though 200G tends to be plenty for proteins between 100-500 sequence length.
3. Find an open SSH port
You can find an open port on your remote HPC server by running the command
ss -ltr
or alternatively with
netstat -ant | grep LISTEN
Either will print an output that looks something like this:
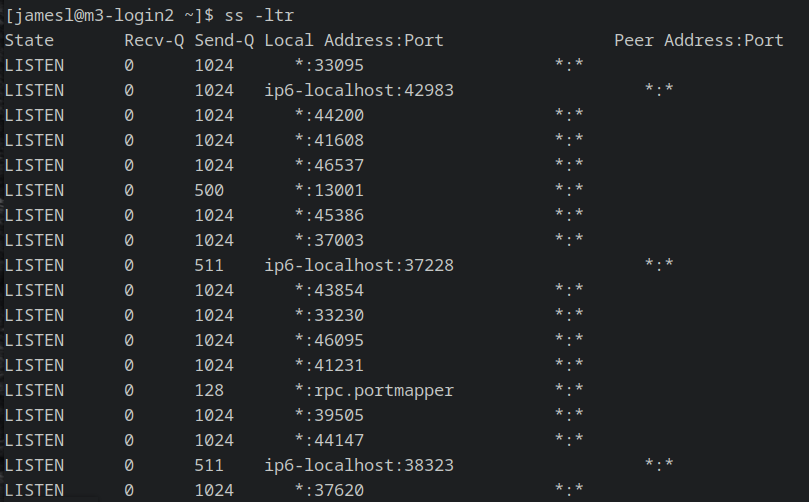
For simplicity I tend to stick with the first port listed with a * under the column
“Local Address”, as this is a listening port on the HPC localhost.
4. Submit Jupyter notebook job to GPU node
After choosing an open port number, we can provide it to the sbatch script from Step 2
and submit it to the Slurm job scheduler like so:
sbatch run-colab-notebook.sh
If the sbatch script has all the relevant information, we should be provided with a Job_ID
number immediately.
Take note of this number because it helps us identity the .err file we’ll need to read
in moment.
Assuming that the GPU partition we requested is free and there are no other jobs scheduled
ahead of us, we will be at the front of the job queue.
Even if we’re at the front of the queue, the actual jupyter notebook may take a minute to get up and running on the GPU.
We can check the progress of the job with,
squeue -u $USER
If you see that time has passed by in the “TIME” column, then our jupyter notebook is up
and running.
Our notebook_log_<JOB_ID>.err file will now have the jupyter token written into it and
will look something like this when opened in an editor:
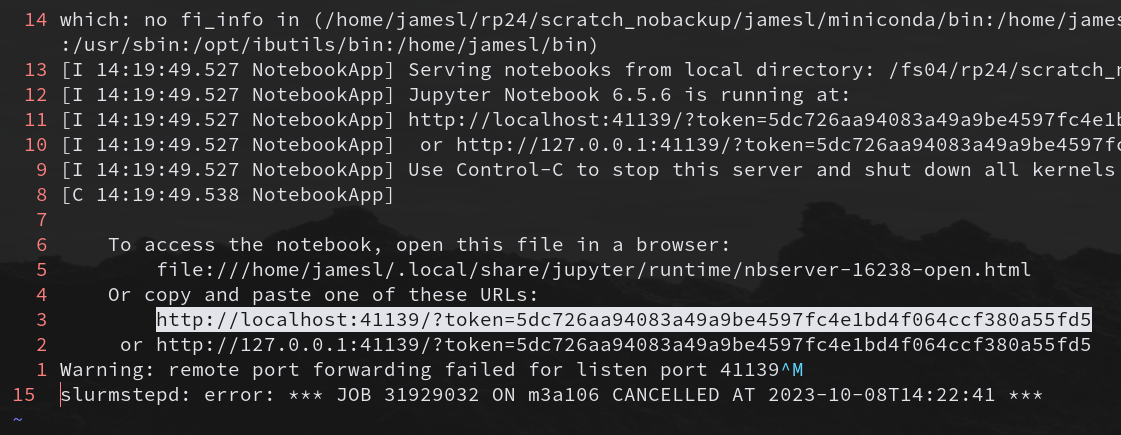
Copy the jupyter token (i.e. the URL starting with http://localhost:…) to your system clipboard and paste it somewhere safe. We will need this for Step 6.
5. SSH port forwarding to GPU node
With the job now running on a GPU node, we need to connect to that specific node over ssh with local port forwarding applied.
First, exit from the HPC remote server so we’re back in our local terminal.
Next, we ssh into the remote GPU node with local port forwarding with
ssh <username>@<NODE_ID>.<server_address> -L <PORT>:localport:<PORT>
For example, here’s what that looks like for myself when my job is running on the “m3a106” node:

Alternatively, if you setup a ~/.ssh/config file as I described above, this command can be shortened to:
ssh <NODE_ID> -L <PORT>:localhost:<PORT>
For example, here’s what that looks like for myself when, once again, I have a job running on the “m3a106” node:
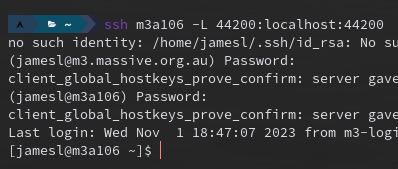
If everything has been setup as expected, you won’t be prompted for any passwords and you’ll login straight away (you should see your host-id change the node-id in the bash prompt).
If you are prompted for a password, then ssh isn’t working.
Double check that your keypair has been setup correctly and the ssh client still has access to your keys with ssh-add -l.
6. Copy Jupyter token to ColabFold local runtime
Now for the moment of truth. In in the ColabFold notebook, click on the small downwards pointing arrow in the top-right corner (just below the settings symbol). Click it and select “Connect to a local runtime” in the dropdown menu. A “local connection settings” window will pop-up with an empty field where you can paste in your jupyter token (which we got in Step 4). Hit “Connect” and wait a moment. If everything has been setup correctly we will see a green tick appear at the bottom of the notebook screen saying that we’re connected to a local runtime!
Note 1: make sure you aren’t using a VPN, otherwise it will likely not connect.
Note 2: I’ve experienced issues with certain internet browsers, such as the Brave browser, which won’t allow the connection to go through (likely because of security features getting in the way). I find that vanilla Chrome or Firefox work the best.
With a connection established, we can finally run the ColabFold code.
Enter your protein sequence of interest into the query_sequence field, change the parameters that you want to change, and hit “Run all” under the “Runtime” tab at the top of the notebook window.
If our virtual environment running on the remote HPC server has all the necessary dependencies, the code should run smoothly to completion.
The first time I setup my conda environment I must’ve missed installing a few dependencies, because the ColabFold code would terminate prematurely.
Thankfully, Colab notebooks have good error messages, so it was obvious what I needed to install into the conda environment and try again.
7. Saving output
When your ColabFold job is finished, the results will be saved in a .zip folder inside the remote directory which you specified in the sbatch script under the --chdir= flag.
Double check that it’s where you expect and then copy them to your local machine.
I find the quickest way to retrieve the ColabFold results is to run the following rsync command on your local terminal:
rsync -avz -e ssh username@remoteserver:/home/user/path/to/output/results.zip ~/path/to/local/dir
And that’s everything. I hope you’ve found this helpful.
References and further reading
ColabFold and protein structure prediction
- The ColabFold github page
- Mirdita M, Schütze K, Moriwaki Y, Heo L, Ovchinnikov S and Steinegger M. ColabFold: Making protein folding accessible to all. Nature Methods (2022) doi: 10.1038/s41592-022-01488-1
- Jumper et al. “Highly accurate protein structure prediction with AlphaFold.” Nature (2021) doi: 10.1038/s41586-021-03819-2
- Evans et al. “Protein complex prediction with AlphaFold-Multimer.” bioRxiv (2021) doi: 10.1101/2021.10.04.463034v1
- Minkyung et al. “Accurate prediction of protein structures and interactions using a three-track neural network.” Science (2021) doi: 10.1126/science.abj8754
SSH resources
- SSH, The Secure Shell: The Definitive Guide
- SSH tutorial by the University of Heidelberg
- Jupyter on HPC Clusters guide by Princeton University
- The HPC wiki
- Using the SSH config file, by Linuxize
- How to set up SSH Tunneling, by Linuxize
- Helpful blog post by ku.io
Virtual environments
Colab notebook help